Home Maintenance 101: Dealing With Mold Before Painting
Mold on painted walls is a common and frustrating problem for many homeowners. Mold thrives in areas with high humidity and limited light, making bathrooms, basements, kitchens, and exterior walls especially vulnerable. If you’re planning to repaint, it’s critical to address mold issues first to ensure a long-lasting, attractive finish. As professional painters, we encounter these challenges regularly and know that proper treatment is essential for aesthetics and your home’s health.
Why You Should Never Paint Over Mold
It can be tempting to paint over mold, hoping to cover up the unsightly stains. However, painting over mold does not solve the underlying problem. Mold spores will continue to grow and eventually resurface, often causing discoloration and peeling paint. Worse, mold can compromise indoor air quality and pose health risks, especially for those with allergies or respiratory issues. To secure a beautiful and durable paint job, mold must be removed entirely and the affected area treated before any new paint is applied.
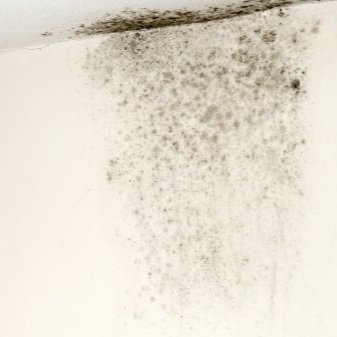
How to Identify Mold on Painted Walls
Mold on painted walls often appears as black, green, brown, or gray spots and patches. A musty odor may accompany these stains. If you’re unsure whether a stain is mold or dirt, apply a few drops of household bleach to the area. If the discoloration lightens or disappears, you’re likely dealing with mold or mildew.
Step-By-Step: How to Remove Mold From Painted Walls
Removing mold from drywall or painted walls involves careful cleaning, disinfecting, and preparation. Here’s how our professional team tackles the job:
Clean the Surface Thoroughly
Start by scrubbing the affected area with a detergent and water solution. Use a stiff-bristled brush to drive the cleaning solution into the surface, removing as much visible mold as possible. This step is essential for both interior and exterior walls.
Apply a Mold-Killing Solution
For most painted walls, a solution of one part liquid bleach to three parts water is highly effective at killing mold and mildew. Wear protective gloves and eyewear, apply the solution to the moldy area, and scrub well. Allow it to remain on the surface for about ten minutes to ensure the spores are killed. Then, rinse thoroughly with clean water and let the area dry completely.
Borax and vinegar can also be used for those who prefer a more natural approach. Mix one cup of borax with a gallon of water, and add vinegar for extra potency. Scrub the surface with this solution and allow it to dry without rinsing. Borax not only kills mold but also leaves a residue that helps prevent its return.
Commercial mold removers and disinfectants are available for stubborn mold or larger areas. These products are engineered to penetrate and kill mold spores on both porous and non-porous surfaces.
Let the Wall Dry Completely
After cleaning, it’s critical to allow the wall to dry thoroughly. Any moisture trapped beneath a new coat of paint will encourage mold to regrow. For best results, use fans or a dehumidifier to accelerate the drying, especially in humid or poorly ventilated areas.
Repair and Sand as Needed
If the mold has caused paint to bubble or peel, scrape away any loose or damaged paint. Lightly sand the area to make a smooth surface for priming and painting. This step also helps to eliminate any remaining mold residue and ensures better paint adhesion.
Prime With a Mold-Resistant Primer
Apply a high-quality acrylic primer containing mildewcide once the wall is clean and dry. A latex stain-blocking primer is ideal for interiors, as it creates a non-porous barrier that prevents mold from feeding on airborne moisture. On exteriors, choose a durable, mildew-resistant primer. Apply the primer liberally for maximum protection.
Choose the Right Paint
After priming, select a top-quality paint formulated to resist mold and mildew. Many manufacturers now offer mold-resistant paints for both interior and exterior applications. These paints contain agents that inhibit mold growth on the paint film, providing an extra layer of defense.
How to Treat Mold on Exterior Walls Before Painting
Mold on exterior walls is often caused by rain, humidity, and lack of sunlight. The cleaning and treatment process is similar to that for interior walls. Still, it may require more aggressive cleaning methods, such as power washing with bleach and water or a commercial mold remover. Always thoroughly dry the surface before priming and painting, as exterior conditions can prolong drying time.
Professional Tips for Long-Term Mold Prevention
Address Moisture Issues
The best way to prevent mold is to control moisture. Fix any leaks, improve ventilation, and use dehumidifiers in damp areas. Install exhaust fans to remove excess humidity in bathrooms and kitchens. Make sure gutters and downspouts direct water away from the house on exteriors.
Use Mold-Resistant Products
Choose products specifically designed to resist mold and mildew, from primers to topcoats. These products are especially important in high-humidity areas and can significantly extend the life of your paint job.
Maintain Regular Cleaning
Even after painting, monitor areas prone to mold. Clean walls periodically with a mild detergent or a vinegar solution to remove any early signs of mold before it becomes a bigger concern.
When to Call a Professional
While small mold patches can sometimes be handled with household cleaners, professionals should address larger infestations or recurring mold issues. The mold covering more than a few square feet or returning despite cleaning may indicate a deeper moisture problem or require specialized remediation.
Professional painting services have the experience, equipment, and products to safely and effectively remove mold, repair damage, and apply the right primers and paints for lasting results. We also understand how to prepare surfaces properly, ensuring your new paint finish is both beautiful and durable.
Can You Paint Over Mold?
Painting over mold is never recommended. While it may temporarily hide the stains, the mold will continue cultivating beneath the paint, eventually causing peeling, bubbling, and discoloration. Worse, it does nothing to address the health risks associated with mold exposure. Always remove and treat mold before painting for a safe, attractive, and lasting finish.
Mold-Killing Paint and Primers
Specialized paints and primers are available to resist mold and mildew growth. Mold-resistant primers contain mildewcide and create a barrier that helps prevent spores from taking hold. Mold-resistant paints are formulated to stop new mold growth on the painted surface. These products are ideal for bathrooms, kitchens, basements, and exterior walls—anywhere moisture is a concern.
Removing Mold From Drywall
Drywall is particularly susceptible to mold because it is porous and can absorb moisture. When treating mold on drywall, it’s important to avoid saturating the surface with water. Use a damp (not soaking) cloth or sponge with your cleaning solution, and always allow the area to dry thoroughly before priming and painting. In severe cases, sections of drywall may need to be replaced if the mold has penetrated deeply.
Summary: How to kill mold before painting
Clean the affected area with detergent and water with a stiff brush to remove visible mold.
Apply a mold-killing solution such as bleach and water, borax and vinegar, or a commercial mold remover. Allow the solution to work for several minutes before rinsing and letting the area dry.
Repair any damage and smoothen the surface.
Prime with a mold-resistant or stain-blocking primer.
Paint with a high-quality, mold-resistant paint.
Address any underlying moisture issues to prevent mold from returning.
Final Thoughts
Dealing with mold on painted walls can be challenging, but with the proper approach, you can restore your space and protect your investment. Removing mold before painting is essential for both the appearance and longevity of your paint job and the health of your home’s occupants. If you’re facing stubborn or widespread mold, don’t hesitate to consult a professional painting service. With expert help, you can be confident that your walls will be clean, safe, and beautifully finished for years to come.
Mark’s Painting offers residential and commercial painting for Tampa, Hillsborough, and Pinellas County. Exterior painting, including priming, sealing, plaster & drywall service, pressure washing. We paint interiors, including ceilings, walls, trim, baseboard, fireplaces, mantels, paneling, wainscoting, doors, and windows. We offer wallpaper removal, caulking, staining and varnishing, refinishing, texturing, specialty finishes, and more. We are licensed and insured. Call us at 813-295-7926