Why Does Interior Paint Peel or Crack? 6 Real Causes
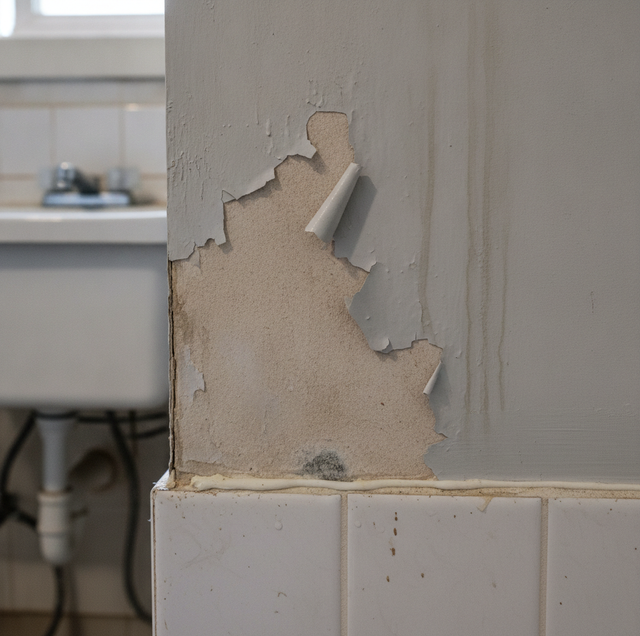
Fresh paint is supposed to stay put. When it starts lifting at the edges, flaking off in chips, or splitting into a web of fine lines, the film is telling you something failed underneath it. Paint is a thin, flexible skin. It only stays put as long as it remains bonded to the surface below and its layers move together. Break either of those conditions, and you get peeling or cracking.
The frustrating part is that the paint itself is rarely the villain. Most failures trace back to what was going on before or during the last paint job, or to something happening inside the wall right now. This guide walks through why interior paint peels or cracks, how to read the pattern it leaves behind, and what actually has to happen before a repaint will hold.
Quick Answer: Interior paint peels or cracks when the film loses its grip on the surface or the layers underneath shift at different rates. Moisture behind the paint is the leading cause, followed by poor surface prep, skipped primer, too many or incompatible coats, low-grade paint, or bad application conditions, and plain age. Fix the moisture and prep first, or a fresh coat will fail the same way.
The Two Things That Keep Paint On A Wall
A coat of paint is doing two jobs at once. It has to grip the surface below it (adhesion), and each layer has to flex and hold together with the layers around it (cohesion). A strip of tape pressed onto a countertop holds as long as the surface is clean and dry, but lay it over dust or a wet spot and it lifts off in a sheet. Paint behaves the same way, only slower and over a much larger area.
When adhesion fails, the film peels or flakes away from the wall. When cohesion fails, the film cracks within itself or across incompatible layers. Almost every peeling or cracking problem is one of those two failures, and figuring out which one you have is what points you to the real cause.
Moisture Behind The Paint: The Number-One Cause
Water is the most common reason interior paint lets go. When moisture gets behind the film, from bathroom or kitchen humidity, a slow plumbing leak, a roof or window leak, or damp drywall that was never fully dry, it works into the bond line between the paint and the surface. The pressure of that trapped water breaks the grip, and the paint lifts, blisters, or peels in patches.
This is why peeling clusters in predictable places: shower and tub walls, the ceiling above a bathroom, the wall under a window, and any spot near plumbing. A dry stretch of hallway wall rarely peels on its own. If the failure is concentrated where water lives, moisture is the first suspect, and no amount of scraping and repainting will hold until the water source is found and stopped.
Poor Prep: Painting Over A Surface That Can't Grip
The second big cause is prep that got skipped or rushed. Paint bonds to whatever it touches. If it touches a layer of dust, a film of cooking grease, a glossy sheen, or old chalky paint that rubs off on your hand, it has nothing solid to grab, so it sits on top and eventually sheets away.
Each of those surfaces needs its own treatment. Dust and grease call for cleaning with the right degreaser, followed by a rinse. A glossy or semi-gloss surface needs to be dulled by sanding or a de-glosser so the new coat can bite in. Chalky old paint has to be scrubbed back to a sound layer. Skip these steps, and the paint may look fine for a while, then release the moment it is stressed by humidity or temperature swings.
Skipped Primer On Surfaces That Demand It
Primer is not an optional extra coat on certain surfaces; it is the layer that enables bonding. Three situations really need it: new drywall, where bare paper and joint compound soak up paint unevenly; patched areas, where spackle and compound behave differently from the surrounding wall; and glossy or slick surfaces, where topcoat alone can't hold.
Paint applied straight over these without primer often peels away in the exact shape of the patch or across the unprimed panel. The primer seals the surface, evens out absorption, and gives the finish coat a consistent layer to grab onto. Leaving it out is a quiet way to guarantee a callback.
Too Many Coats Or Incompatible Layers: Where Cracking Comes From
Peeling is about the wall. Cracking is often about the layers themselves. Pile on too many thick coats and the built-up film gets stiff and heavy, and it can't flex with the wall as the house expands and contracts. The result is splitting.
Incompatible layers cause the same trouble. The classic case is putting flexible latex directly over hard, glossy oil-based paint. The two films move at different rates and don't bond, so the latex cracks or peels off. When a hard coat sits over a softer one, or many stiff coats stack up, the surface can break into a network of cracks. Reading that crack pattern is the next clue.
Crazing And Alligatoring Versus Flaking And Peeling
The shape of the failure tells you a lot. A network of connected cracks across the surface, sometimes fine and shallow (crazing) and sometimes deep with raised segments that resemble reptile skin (alligatoring), points to a cohesion problem: too many coats, a hard-over-soft mismatch, or layers that dried at different rates. The film is breaking within itself.
Flaking and peeling look different. Here, the film lifts cleanly away from the surface in chips or curling sheets, leaving bare wall behind. That is an adhesion problem, and it sends you back to moisture or prep. Sorting a network of cracks from a lifting film is often the fastest way to tell whether a layer's problem is water or prep before you touch a scraper.
Cheap Paint And Bad Conditions
Two more causes are worth naming. Low-grade paint carries less binder, the resin that holds pigment together and glues the film to the wall, so it is quicker to chip, crack, and lose its grip. Better paint isn't just marketing here; more binder really does hold better, though the surface still has to be prepped for any paint to bond.
Conditions matter just as much. Paint applied when a room is too cold, too hot, or too humid can't form a proper film, and recoating before the previous coat has cured traps solvent and moisture inside. Any of these leaves a weak film that cracks or peels over time, even when the color looks perfect on day one.
Age And Normal Film Fatigue
Finally, paint gets old. Over many years, even a well-applied film slowly loses flexibility and becomes brittle, and a brittle film cracks and flakes when the wall moves with the seasons or when it takes a knock. This is normal wear rather than a defect, and it is usually spread evenly across an old surface rather than clustered as in a moisture failure. When age is the cause, a proper scrape, sand, and repaint resets the clock.
How To Fix It So The Repaint Holds
Diagnosis comes before repair. First, decide which of the three problems you have. A film lifting near water is a moisture problem. A film released from a dusty, greasy, or glossy surface is a prep problem. A network of cracks over stacked or mismatched coats is an incompatible-layers problem. Each one is fixed differently, and treating the wrong cause wastes the whole job.
If moisture is in play, find and stop the source first, whether that is a leak, poor ventilation, or damp material, and let the wall dry fully. Then scrape and sand all loose paint back to a sound edge, feathering the transition so the repair won't telegraph through. Clean off dust and grease, de-gloss any slick spots, and spot-prime every bare, patched, or glossy area. Use a quality paint compatible with what's already on the wall, and apply it at the right temperature and humidity, allowing full dry time between coats.
Latex over old oil deserves its own note. Because flexible latex doesn't bond to hard oil paint, that surface has to be scuff-sanded and coated with a bonding primer before the latex goes on, or the new paint peels in sheets.
A Safety Note On Older Homes
One caution matters before any sanding or scraping. Homes built before 1978 may have lead-based paint under newer layers, and disturbing it, especially by dry-sanding, can release lead dust that is hazardous to breathe. If your home is that old and you plan to scrape or sand, have the paint tested first, or bring in a professional trained in lead-safe practices. This is a health matter, not just a finish-quality one.
Frequently Asked Questions
Moisture is getting behind the film. Water breaks the bond between the paint and the surface, which is why peeling clusters are found where water lives, in bathrooms, around windows, and near plumbing runs, rather than on a dry interior wall. A useful field test is to press painter's tape firmly onto a suspect area and pull it off: if paint comes away and the exposed spot feels cool or damp, you're chasing a water source, not a paint brand.
That connected web of cracks is called alligatoring or crazing, and it usually comes from too many thick coats or a hard coat sitting over a softer one, with the layers flexing at different rates. It is a cohesion failure within the film, unlike a moisture peel, where the film lifts cleanly off the wall. Deep alligatoring generally can't be spot-patched; the affected area has to come off to a sound layer or down to the substrate before recoating, because thin cracks will keep telegraphing through anything laid on top.
No. New paint applied over a loose edge simply lifts along with it, so the loose paint has to be scraped and feather-sanded back to a sound edge, and the exposed spot primed before you recoat, or the fresh layer peels along the same line. After scraping, run a flexible putty knife or your fingernail along the border, and keep going until nothing more flakes off; that resistance is how you know you've reached paint that is still bonded and safe to paint over.
Because paint bonds only to what it physically touches. A wall left dusty, greasy, glossy, or chalky gives the film nothing to grip, so cleaning, de-glossing, and priming are the steps that actually create that grip. A quick check for chalkiness is to wipe the wall with a dark, dry cloth: if it comes away with a powdery residue, the old paint is breaking down and needs to be washed and sealed before anything new will stick to it.
Yes, if you skip prep. Flexible latex doesn't bond well to hard, glossy oil paint, so the surface has to be scuff-sanded and coated with a bonding primer first, or the latex peels off in sheets. You can identify old oil paint by rubbing a cotton ball dampened with denatured alcohol on the surface: if no color transfers and the finish stays hard, it's likely oil and needs that bonding step before any water-based coat.
It does. Painting in high humidity, or recoating before the previous coat has fully cured, traps moisture and slows the bond, so paint applied in damp conditions or rushed between coats is more likely to crack or peel later. Most interior paints require a relative humidity below roughly 50 percent and enough time between coats for the film to cure rather than just dry to the touch; a running bath or shower nearby during the job is enough to push a bathroom out of that range.
Book a walkthrough — get a repaint that holds because the cause is fixed first. Mark's Painting serves Tampa Bay and the surrounding areas. Licensed and insured. Call (813) 831-5433 for a free estimate.
